")
Samsara Room is a new atmospheric point-and-click adventure game. As players navigate through the room, they uncover clues and unravel the mystery. In 1935, the game follows Rusty Lake: Roots and William Vanderboom’s rebirth through the circle of life. The version adds riddles and ties into the Rusty Lake series. Check out full guide of Samsara Room: A complete walkthrough guide.
Check Out The Walkthrough
Firstly, take the candle from the planter at the top of the dresser and look at the mirror and slide it around to see a symbol. Note it down for later. From there move in the left direction and began to solve the puzzle on the dresser to get another candle.
Slide open the dresser drawers to reveal another a fish, candle, and a knife and go back to the mirror scene. Tap the table and read the letter. Open the envelope with the knife. Pull out the paper for a hint. It reads ENLIGHTEN ME. Remove phone from receiver. Spell ENLIGHTENME and take matches.

To remove the wallpaper, turn right, open the window, and then continue. To light all four candles, match three of them. Set the fish on the lower plate. Afterwards, tap the white cube and the hole. Despite the similarities, this room is unique. Point your fish head in the direction of the mirror. Gather the shell that sits on the mirror. By adjusting the mirror, you can view other symbols.
Retrieve the handset from the holder once more. Begin tapping the bubbles on the left (the one with the deeper color) and work your way to the right. It then says, ‘LET IT SINK IN’. To find a key within the paper boat, tap on it until it unlocks. Feel free to get it. Grab the jar from the interior of the glass cupboard by using the key to open it. Once again, make a right turn and get the fish.
Press the right button once more to hone in on the bottle. Press the X to open the bottle. Continue tapping the X’s until you get the shell. Locate the hanging nail by inspecting the side of the clock. Do not stop pressing items until you detect a hand. It will return with a heart if you give it the knife. Feel free to get it. To get the shell, head back to the floating box and turn right.
The strange grey glob needs tapping. After that, press down on any bumps that aren’t located on black areas. Get the clamshell. After this, you ought to have four shells. Arrange them in the same spot as the candles, then set the plate on top. Return to the hole. The initial room will be yours again. Turn right and capture the gecko with the jar.
Return to the entrance and set the gecko on the dish. If you continue, you will reach a different room, but this one is upside down. In the mirror, you appear as a lizard. Turn it to reveal an alternate symbol. The marble in the planter should be removed.
After you’ve turned right, light the candles in descending order of length with the matches. Snag a different marble. Make a U-turn. Transfer the artwork from the left side to the right and then release it. This will rip. To get the marble, you must first pull the paper down.
At the very bottom of the center artwork, you can see the time: 03:55. It is recommended to set the clock to 3:55. This indicates that the large hand ought to be on XI while the smaller one ought to be around the IV. The next step is to grab the key that is in the triangle shape.

Take a right turn. Reach into the bookcase and retrieve the marble. It is necessary to reorganize the books such that the red ones align with the contour and the S is located correctly. This is how it ought to seem. Afterwards, take the book out.
Each of the four marbles has joined us. Return to the portal of time. Put the four marbles in their respective corners and return to your fish shape by using the fish. Near the mirror on the wall, you can see a book named Samsara floating. It has an additional clock. 2:15 is the time.
Get a second triangle key and set the timer to 2:15. In this chamber, you can use the jar to fill it with water. Stick the heart onto the plate to revert to your human-like state. Direct your gaze towards the wormhole-adorned wall and examine the book resting on the floor. “THE SEED OF SACRIFICE” is written on it.
Remember the time—turn the page for another hint. Three symbols are also displayed. Another clock clue with the time set to 8:25 can be found when you turn the page again. It states that the past is eternal. One more hint: MIRRORS NEVER LIE—find it on the next page. Get the third triangle key and return to the clock; set the time to 8:25.

Open the clock to find a body inside, which you can access by placing the three triangle keys on its lock. To induce him to release a seed, tap his hand. Seize it. Drop the seed into the pot. It will flourish when you add water from the container.
For a closer look at the plant, transform back into the lizard. Look! A flower! After removing each petal, reach out and seize the worm. Go through the portal using the worm to transform into a worm. Rotate the mirror to reveal an alternate symbol.
Keep your back to the mirror and patiently wait for a flower to begin to droop. Press and hold it until it leads you to the dresser, and then retrieve it. Investigate the inner workings of the clock and retrieve the blade. To uncover a flower petal, you must also set aside the wood fragments.
To remove the flower petal, use the knife to crack open the book. To send the phone tumbling to the ground, tap it multiple times. After you’ve removed the screws from the receiver, you may open it up with the knife. After you finish the circuit as outlined below, tap the glowing dots multiple times to release the petal. Take it.
Enter the corpse’s mouth by crawling over to it. Tap on trees to reveal a shining light. After that, get the light and go on to the next one. After you’ve done that for all four, proceed.
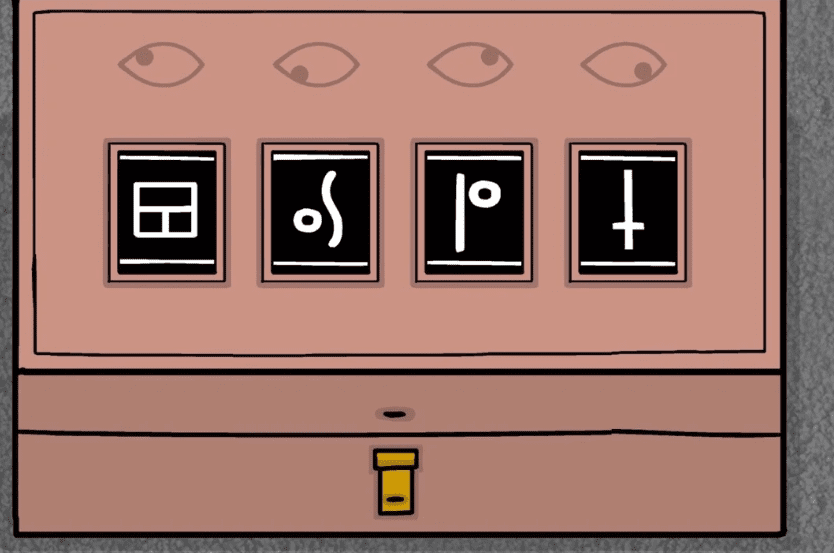
There are now four containers containing the four metamorphoses. Each one ought to be illuminated. The next step is to align the hands such that they reflect the symbols you observed in the mirrors. Next, remove the egg.

Get back to where you were and arrange the egg on the entrance plate, encircling it with all four petals. Use the gateway to enter a different dimension. I believe it’s a crow. Go around to the right and grab the egg from the secret door. After you’ve turned right, add the egg to the nest.
Just give them a little tap to open. After that, you’ll need to tap on the baby birds in the correct sequence; the commands go something like “open mouth” to “new bird” and so forth. Make a U-turn. Remove the weight from one drawer and look in the other two for the pieces of paper that contain clues.
Return to the wall of mirrors. Gently tap the sky. What causes them to come now instead of earlier is something I don’t fully understand. Transform them from an egg to a gecko, worm, and fish by rearranging their surroundings. You may set the clock to 7:25 by repositioning the other cloud. The time will be changed to evening at 7:25. Collect the sunflower by removing it from its nest. Make a U-turn. To send the paper plane tumbling, tap on it. After you open it, you’ll find a hint with a photo of the phone that reads “RISE UP” along with a feather.
Return to the phone and take up the handset. The hot air balloon will emerge when you spell RISEUP, and you can tap it. Your screen will disappear. Return to the timepiece and press the hot air balloon button. To start the fire, light the match and then turn on the gas. After that, cut the bag open with the knife.

Get out of here and open the bag. Extract the scales and sand from within. At this time, disregard the box. Before you put the sunflower in the planter, return to the dresser and add the sand. Raise the sun such that the flower topples over in its pursuit of it. The sunflower seed can be picked up. Bring the two scales back to the mirror and place them on the hooks and now weigh everything against the weight and you get,
- Gecko = 1
- Weight = 1
- Worm = 0
- Knife = 3
- Matches = 2
- Heart = 4
- Fish = 5
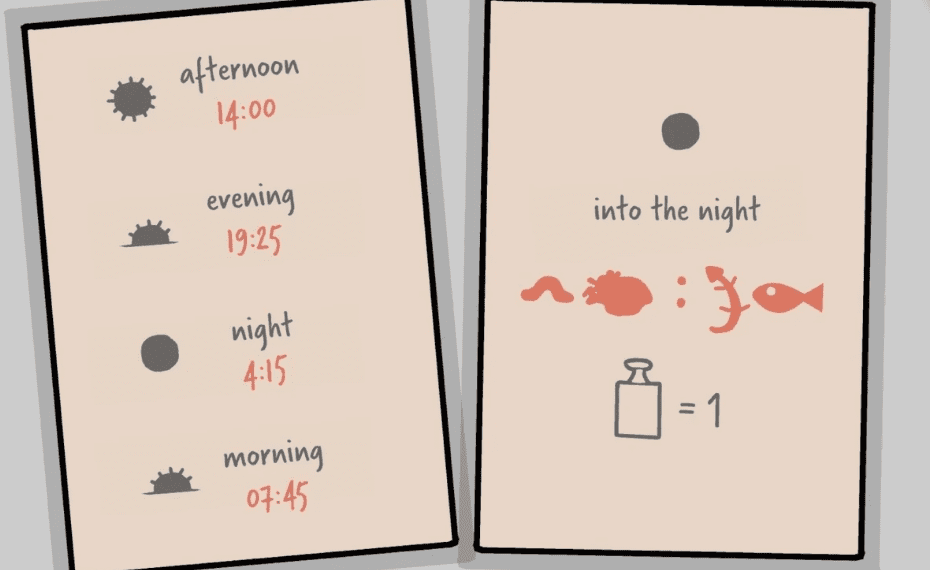
Find out what time it is for Night by utilizing the hint that was in the drawer. Here is the text,
- Worm Heart : Gecko Fish
For the nighttime setting, set the clock to 04:15. Get the owl to take flight by tapping on him. Cut a slit in the moon using the knife after you zoom in. Behold, a spectacular eye! To view four distinct constellations, simply rotate it such that you can look at each of the four corners. Now, in order to open the box by the timer, you must use these four hints.
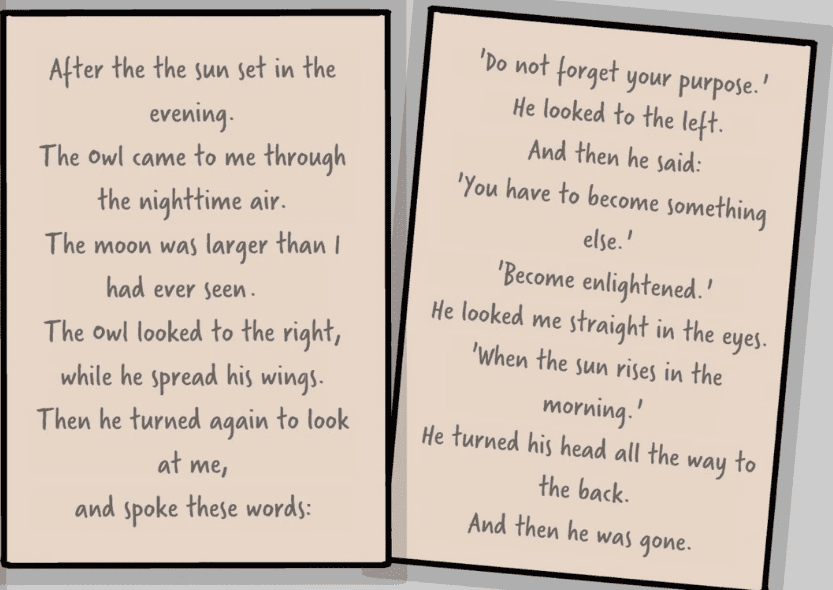
Inside, you’ll find a broken watch. If you can rearrange the gears, you can correct it and get a new time—7:45. Study the owl’s pointing directions (Right, Straight Ahead, Left, Straight Ahead, Back) on the drawer notes. Get the owl to look in those directions as you pause in between. He will then take flight. Plunder his feather.
For morning, set the timer to 7:45. Touch the bird that flies through the sky. It needs the worm, gecko, heart, and fish as food. The next step is to tap on it till it makes a screech sound. Here is yours. Return to Afternoon by setting the clock to 2:00.
Transfer the sunflower seed to the squirrel while you keep the feather. We have all four feathers now. Afterwards, add the infant and arrange them around the entrance. Afterwards, you can finish the game by just tapping on various objects.